Apart from being quite ill after I got back from the UK, I don't know why I've been unable to blog anything again lately: Just got out of the habit and couldn't get back in to it. So here's a page that I finished a few weeks ago, just to break the ice really, with the intention to blog more (again)...
The white card base and layers are all coloured with Broken China Distress Ink: I used a brayer on the base and different resist techniques (paint on the flowers and clear embossing powder on the dots) and tone-on-tone (diamonds). I edged the pieces and page with Aged Mahogany for a bit of contrast and stamped with Sepia Archival ink.
Stamps: Hampton Art, Inkadinkado. Title cut from foam with Sizzix alphabet.
The photo isn't mine: It's a nursery photo of our grand-daughter but I don't know who to credit.
Sunday, 27 March 2011
Sunday, 27 February 2011
ArtsyCraft - Meeting Tim Holtz
I have had an amazing week! First, at the Stitches Hobby and Art trade show, seeing what is new: I headed straight to the Sizzix booth to see the Vagabond which I loved! Look at this display, mostly Tim's work: I have the machine and all the new dies and embossing folders on order :)I met Stacey Caron, who is the founder of Spellbinders, and Jo Channon, who is often on Create and Craft TV, also 'PaperArtsy' Leandra and Mark Franich. Of course, it was a great opportunity to place orders and I have lots and lots of new stock on its way, but that is for later...
Thursday was the ArtsyCraft event: Met so many people, Tim Holtz included. He was lovely, a great teacher and so patient with everyone's demands for photos and autographs. Mario, Tim's personal assistant, was just as lovely: I went to shake hands and got a big hug instead! We started a configuration box in Tim's class and received lots of goodies from Ranger and Tim, including some of the new idea-ology ranges. No photo yet until it is finished.
After lunch was Lin and Leandra's class using more Ranger and idea-ology along with new PaperArtsy products. I finished this project:
One of the best things was meeting people that I had previously only known via the internet but art brings you together: First photo here with the very talented Linda who has been a blogging buddy for some time. She is part of Lin's LB Crafts team who all worked like crazy on the preparation and to ensure all went smoothly on the day. Second photo is with Sally and Bethan both of whom I have met on the All Things Tim Yahoo group, have exchanged emails with and was also delighted to meet. My only regret is that, in our art-filled day, there were some people I didn't get to meet or chat with. I look forward to the next time.Sunday, 13 February 2011
Grungepaper business card holder
One of the many lovely people on the 'All Things Tim' yahoo group is the very creative Eileen who shared her template for making business card holders from Grungepaper. Thank you Eileen: I knew I HAD to make one: My business cards needed the protection and I just loved the idea. I want it to be able to take the use and abuse I am going to give it so kept the decorations fairly simple: I coloured the grunge with Dusty Concord Distress Ink, embossed it in the Cuttlebug (Floral Fantasy) and coloured some Tim Holtz idea-ology foliage and hitch fastener closure with alcohol inks.
I love it! And, as the challenge on 'Simon Says Stamp and Show' is embossing, it is getting entered there too.
You can see more of Eileen's card holders here and here.
I love it! And, as the challenge on 'Simon Says Stamp and Show' is embossing, it is getting entered there too.
You can see more of Eileen's card holders here and here.
Tuesday, 8 February 2011
Oh to be 21 again...
That could be my future in that photo, stretching off in to the distance...You'll notice I haven't recorded the year! I'm the one in the red top, with my best friend Mads, at the top of Mt Blanc on a university field trip of France and Italy.
Used: Cuttlebug embossing border and alphabet; Stamps by Tim Holtz, 4heures37, Hampton Art and Artemio; Versafine and ColorBox chalk inks.
Sunday, 30 January 2011
Fairy Cakes - Decoupage cards
I've been asked to make some samples for a cherry fair in a local village so here are a few cards - they need to be quick to make so these pre-cut decoupage are ideal especially as decoupage is very popular here.
Ces cartes sont exemples pour la fête de cerisiers en juin (oui, en avance!). J'ai utilisé le bloc de découpage et papiers 'Fairy Cakes' chez Trimcraft, l'encre craie ColorBox 'Rose Petals', tampons d'Artemio et ruban.
Both cards are made from the Trimcraft 'Fairy Cakes' decoupage and paper pack. I added ColorBox Rose Petals ink, Artemio stamps and PaperMania ribbon and bow.
I'm entering these for the challenges on Cupcake craft 'Food for thought' and PaperPlay 'Layer it up'.
Ces cartes sont exemples pour la fête de cerisiers en juin (oui, en avance!). J'ai utilisé le bloc de découpage et papiers 'Fairy Cakes' chez Trimcraft, l'encre craie ColorBox 'Rose Petals', tampons d'Artemio et ruban.
Both cards are made from the Trimcraft 'Fairy Cakes' decoupage and paper pack. I added ColorBox Rose Petals ink, Artemio stamps and PaperMania ribbon and bow.
I'm entering these for the challenges on Cupcake craft 'Food for thought' and PaperPlay 'Layer it up'.
Monday, 20 December 2010
Tim Holtz Tags 7-9
Not sure I will get the last three tags made this side of Christmas but here are the latest three based on Tim Holtz' tutorials. I think these are my favourites so far:
Tag # 7 - The tag was embossed with an inked folder (Cuttlebug 'Distressed Stripes') and then coloured more with Distress Inks and has a layer of Distress Rock Candy Stickles spread over it. The poinsettia is hand-cut pieces made with Sticky-back canvas on Grungepaper sprayed with Color Wash and a Pearly Pearls solution and then Stickles added with an 'accroutement' button in the centre. The letters are pre-cut Grungeboard coloured with Distress inks and stamped with black Archival ink.
Tag # 8 - I used the 'extreme masking' technique to create the Santa and sleigh background with Distress and archival inks and Tim Holtz 'seasonal' masks. The houses are cut with his Townscape 'On the Edge' die and I finished the tag with various pieces of idea-ology metal work and a printed greeting coloured with Distress inks.
Tag # 9 - The rich colours of this tag were created by spraying it with gold Cosmic Shimmer and Pearly Pearls solution after it was stamped with a Tim Holtz music stamp and sepia Archival ink. I created the rosette die with Tim Holtz paper, Walnut Stain Distress ink and more spray. Finished with letters cut on the Cuttlebug from sanded ColorCore card, brads, and bits of decoration from my stash.
Tag # 7 - The tag was embossed with an inked folder (Cuttlebug 'Distressed Stripes') and then coloured more with Distress Inks and has a layer of Distress Rock Candy Stickles spread over it. The poinsettia is hand-cut pieces made with Sticky-back canvas on Grungepaper sprayed with Color Wash and a Pearly Pearls solution and then Stickles added with an 'accroutement' button in the centre. The letters are pre-cut Grungeboard coloured with Distress inks and stamped with black Archival ink.
Tag # 8 - I used the 'extreme masking' technique to create the Santa and sleigh background with Distress and archival inks and Tim Holtz 'seasonal' masks. The houses are cut with his Townscape 'On the Edge' die and I finished the tag with various pieces of idea-ology metal work and a printed greeting coloured with Distress inks.
Tag # 9 - The rich colours of this tag were created by spraying it with gold Cosmic Shimmer and Pearly Pearls solution after it was stamped with a Tim Holtz music stamp and sepia Archival ink. I created the rosette die with Tim Holtz paper, Walnut Stain Distress ink and more spray. Finished with letters cut on the Cuttlebug from sanded ColorCore card, brads, and bits of decoration from my stash.
Saturday, 18 December 2010
Tim Holtz Tags 4-6
Here's the second installment of my tags following Tim's inspirational examples.Tag # 4 - I don't have the same paper Tim used or the 'facets' but I used the paint resist technique with Distress inks to create the background and I loved the technique he describes with the alcohol inks and I used a fragment charm for this.
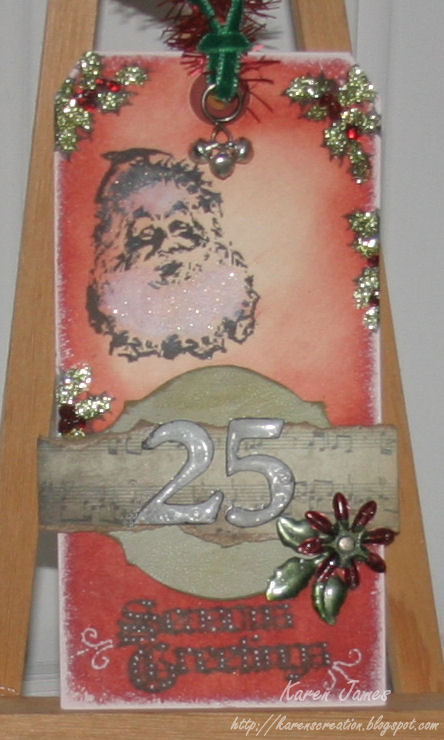
Tag # 5 - The focus technique was enamelled metal but, as I didn't have the metal numerals, I painted and embossed grungeboard numbers instead. I hand-cut the plaque shape and used 'picket fence' crackle paint and coloured this with Distress inks. I used the paint resist technique with distress inks again on the tag and I used the mini set of Christmas stamps, alcohol inks on 'foliage' and lots of Stickles, white flock and glitter.

Tag # 6 - As I didn't have the same embossing folder or die that were the focus of this tag, I substituted older Cuttlebug designs and used the same techniques.
If you haven't seen Tim's tags yet (where have you been ???), then you should go see how generous he has been in sharing techniques and ideas, not just for tags but for lots of other things too.
Voici les trois étiquettes #4 – 6 que j'ai créées avec les mêmes techniques chez Tim Holtz.
Friday, 10 December 2010
Tim Holtz style Christmas Tags
Firstly, apologies for being such a bad blogger last month: Made lots of things, just didn't get time to blog them. I did however raise 60€ for the Téléthon charity by selling my cards last Saturday, despite the terrible weather! Also grateful to have received 2 stamps and some crinkled ribbon from Kristine: Her own creations! The ribbon could not have been better timed as you'll spot below!
So, on to the thing I have been waiting for...Tim Holtz' Christmas Tags. From 1st-12th December Tim gives full instructions for a new tag each day on his blog but, of course, few people have everything he has and that's good as it forces you to be creative. I have been working on several tags at once as they have various drying stages, etc and I've only been able to snatch a few minutes here and there to work on them but I have now finished the first three:
Tag #1 : I don't have the 'Rickety House' or the fence dies so I sketched these on to grungepaper and cut them out by hand. I have tried on all the tags to follow the techniques so used the Cuttlebug 'Distressed Stripes' folder to emboss a second layer of grungepaper and use as instructed on the house. I mixed white flock and glitter together to make the 'snow' and coloured plastic with a yellow permanent pen to line the windows.
My 'tree' is made of wool hardened with glossy accents, white paint dabber and my 'snow' mixture.
Tag #2 : Couldn't follow the technique as I don't have any felt but I went ahead and inked my stamp with different colors of distress (forest moss and walnut stain) and just stamped 3 times without re-inking the stamp to get the impression of lots of trees. I embossed this and then inked and stamped the tag using Tim's Mini Holidays 2 stamps.


Tag #3 : I substituted in a grungeboard bird from the 'Nature' pack and covered this with tissue tape, alcohol inks and Rock Candy Stickles. Loved making the tissue tape flower and I added a fringe and 'nest' of silk paper with the branch from Tim's 'Urban Grunge' stamps and a PaperMania vintage die-cut mounted on grungepaper. With the Rock Candy Distress Stickles used on this tag, I'm also submitting it to Linda's great 'Compendium of Curiosities' challenge #24.
I have a lot of catching up to do but the next three are nearly done so I will be back with the next installment...
Mes premiers trois étiquettes des Noël chez Tim Holtz : Depuis le 1 décembre, toutes les instructions sont sur son blog avec une nouvelle étiquette chaque jour pour les 12 jours. Le but n'est pas à copier mais pour essayer les techniques et prendre l'inspiration de ses modèles.
So, on to the thing I have been waiting for...Tim Holtz' Christmas Tags. From 1st-12th December Tim gives full instructions for a new tag each day on his blog but, of course, few people have everything he has and that's good as it forces you to be creative. I have been working on several tags at once as they have various drying stages, etc and I've only been able to snatch a few minutes here and there to work on them but I have now finished the first three:
Tag #1 : I don't have the 'Rickety House' or the fence dies so I sketched these on to grungepaper and cut them out by hand. I have tried on all the tags to follow the techniques so used the Cuttlebug 'Distressed Stripes' folder to emboss a second layer of grungepaper and use as instructed on the house. I mixed white flock and glitter together to make the 'snow' and coloured plastic with a yellow permanent pen to line the windows.My 'tree' is made of wool hardened with glossy accents, white paint dabber and my 'snow' mixture.
Tag #2 : Couldn't follow the technique as I don't have any felt but I went ahead and inked my stamp with different colors of distress (forest moss and walnut stain) and just stamped 3 times without re-inking the stamp to get the impression of lots of trees. I embossed this and then inked and stamped the tag using Tim's Mini Holidays 2 stamps.


Tag #3 : I substituted in a grungeboard bird from the 'Nature' pack and covered this with tissue tape, alcohol inks and Rock Candy Stickles. Loved making the tissue tape flower and I added a fringe and 'nest' of silk paper with the branch from Tim's 'Urban Grunge' stamps and a PaperMania vintage die-cut mounted on grungepaper. With the Rock Candy Distress Stickles used on this tag, I'm also submitting it to Linda's great 'Compendium of Curiosities' challenge #24.
I have a lot of catching up to do but the next three are nearly done so I will be back with the next installment...
Mes premiers trois étiquettes des Noël chez Tim Holtz : Depuis le 1 décembre, toutes les instructions sont sur son blog avec une nouvelle étiquette chaque jour pour les 12 jours. Le but n'est pas à copier mais pour essayer les techniques et prendre l'inspiration de ses modèles.
Sunday, 31 October 2010
Tim Holtz - inspired scrap page
My entry for the Compendium of Curiosities Challenge #19, hosted by the lovely and talented Linda, using Tim Holtz's 'Extreme Masking' technique on the base page.
I didn't get any pictures on my son's birthday earlier in the month so was pleased at getting these photos and I've written on the main one the things he loves best at his age now. Doesn't show well in the picture here but it is legible without overpowering the photo, which was exactly what I was hoping for.
In creating the page, I have not only used Tim's technique, I have also used his 'Lost and Found' papers, Distress Inks (Walnut Stain and Black Soot), Glossy Accents, the Sizzix Alterations 'Filmstrip' die plus lots from Tim's idea-ology line: Film strip transparency, sprocket gears, Corner, Salvage Stickers, and, of course, the Timeworks Mask (both the positive and negative pieces). Also used some dark brown Bazzill, Hampton Art stamps and recycled some cardboard and string, also coloured with Walnut Stain Distress Ink!
Une page inspirée par Tim Holtz : J’ai utilisé ses papiers ‘Lost and Found’, sa matrice ‘Filmstrip’ chez Sizzix, embellissements de sa gamme ‘idea-ology’, inclut la masque ‘Timeworks’, et beaucoup de l’encre Distress (Walnut Stain et Black Soot). En plus, j’ai utilisé sa technique ‘Extreme Masking’ de sa livre ‘Compendium of Curiosities’ pour le défi chez Linda.
I didn't get any pictures on my son's birthday earlier in the month so was pleased at getting these photos and I've written on the main one the things he loves best at his age now. Doesn't show well in the picture here but it is legible without overpowering the photo, which was exactly what I was hoping for.In creating the page, I have not only used Tim's technique, I have also used his 'Lost and Found' papers, Distress Inks (Walnut Stain and Black Soot), Glossy Accents, the Sizzix Alterations 'Filmstrip' die plus lots from Tim's idea-ology line: Film strip transparency, sprocket gears, Corner, Salvage Stickers, and, of course, the Timeworks Mask (both the positive and negative pieces). Also used some dark brown Bazzill, Hampton Art stamps and recycled some cardboard and string, also coloured with Walnut Stain Distress Ink!
Une page inspirée par Tim Holtz : J’ai utilisé ses papiers ‘Lost and Found’, sa matrice ‘Filmstrip’ chez Sizzix, embellissements de sa gamme ‘idea-ology’, inclut la masque ‘Timeworks’, et beaucoup de l’encre Distress (Walnut Stain et Black Soot). En plus, j’ai utilisé sa technique ‘Extreme Masking’ de sa livre ‘Compendium of Curiosities’ pour le défi chez Linda.
Sunday, 24 October 2010
Sunday Stamper & CCC #18 - Paint Resist
There are so many things you can do with Distress Inks: I love this technique: Paint resist. And all you need to do is look at p37 of Tim Holtz's Compendium of Curiosities and you can love it too! So, this card is for the CC challenge hosted by Linda. And, because I've gone green, it is also for Hels Sunday Stampers challenge: A good reason for leaving the CCC until the last day! In case you're wondering, after the paint resist technique I flicked water on to the paper to get the spots - I mean deliberately ! - Another technique I love.
Used: Snow Cap Paint Dabber; Hampton Art stamp; Distress Inks (Shabby Shutters, Frayed Burlap).
Subscribe to:
Posts (Atom)


